QuickBooks Desktop Pro and Premier dominated the market for small business accounting for decades, but it’s time to move on by converting your QuickBooks Desktop file to QuickBooks Online. This guide gives step-by-step instructions for the conversion along with some helpful tips.
If you’re unsure you’re ready to make the leap, you can learn more in our QuickBooks Online review.
Why convert now? QuickBooks Desktop Pro and Premier will be discontinued for new customers on Aug. 1, 2024. They will continue to be supported for existing customers, but we believe that support will likely end in two or three years. Intuit has not announced any plans to discontinue QuickBooks Enterprise.
Featured Partners
Step 1: Choose your plan and subscribe to QuickBooks Online
We chose QuickBooks Online as the overall winner in our guide to the Best Accounting Software. Before converting your QuickBooks Desktop file, put some thought into which QuickBooks Online subscription will be best for your business. Here is a summary of the four plans to choose from:
| Simple Start | Essentials | Plus | Advanced | |
|---|---|---|---|---|
| Price per month | $30 | $60 | $90 | $200 |
| Users included | 1 | 3 | 5 | 25 |
| Invoice C=customers | Yes | Yes | Yes | Yes |
| Manage unpaid bills | No | Yes | Yes | Yes |
| Track time | No | Yes | Yes | Yes |
| Track inventory | No | No | Yes | Yes |
| Fixed asset accounting | No | No | No | Yes |
Be sure to choose a subscription that provides sufficient users because there is no way to add additional seats beyond what is included in the plan. QuickBooks Online Plus is the most popular version, with five users and the ability to track both time and inventory. You can learn all the differences and how to choose the best option for your business by reading our QuickBooks Online review.
Once you decide on the QuickBooks Online plan for your company, visit QuickBooks Online to subscribe. You can receive 50% off the above pricing for the first 12 months of your subscription.
Step 2: Prepare your QuickBooks Desktop file
You’ll prepare your QuickBooks Desktop company file by checking a few critical items to ensure the conversion will work and then updating your company file information as much as possible.
Download the latest release and updates
Before starting the conversion process, ensure your QuickBooks Desktop program is up to date. Open your QuickBooks Desktop program, then click on Update QuickBooks Desktop under the Help menu:
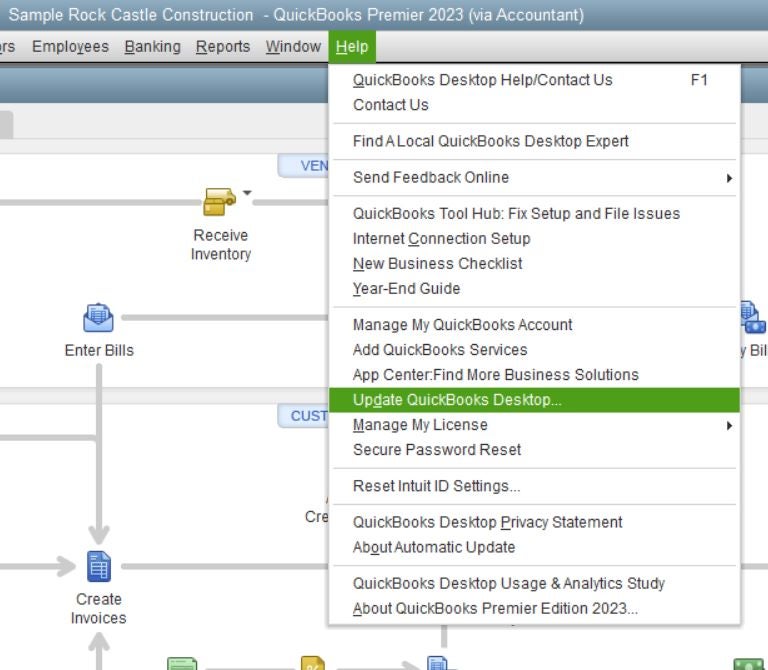
QuickBooks will open a new window titled Update QuickBooks Desktop. Click on the blue button, Update Now. You might be prompted to log in to your QuickBooks account before the updates are downloaded. Follow the prompts to download and install all of the available updates.
Check the target count of your QuickBooks Desktop company
To use the automated conversion wizard, the Total Targets count in your desktop company file must be less than 750,000. Check your target count by pressing Ctrl+1 from within your QuickBooks Desktop program. A new Product Information window will appear. Your company’s target count will be shown in the File Information section, as highlighted below:
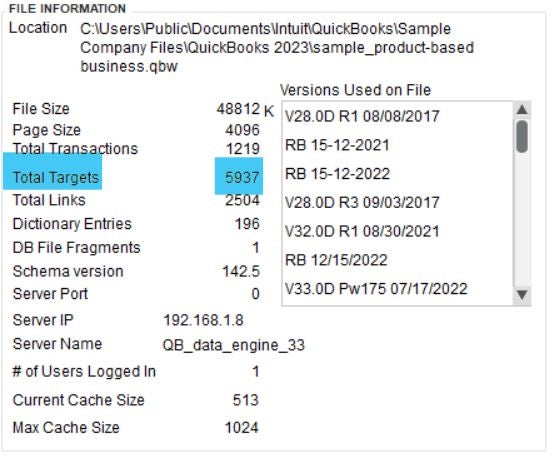
If your company has over 750,000 targets, we recommend starting your company fresh in a new QuickBooks Online company. You can save time by transferring vendors and customers and your chart of accounts by exporting these lists from QuickBooks Desktop and importing them into your new QuickBooks Online company.
Update your transactions in QuickBooks Desktop
We recommend making your company file as current as possible immediately before the conversion. We recommend doing the following:
- Ensure all bank reconciliations are up to date.
- Categorize transactions from all bank feeds.
- Make any desired changes to your chart of accounts.
- Pay any unpaid bills.
- Review outstanding customer invoices and write off any that will not be collected.
- Review your undeposited funds account to make sure only checks and cash that are waiting to be deposited are sitting in the account.
- Make and record any outstanding payroll deposits or sales tax payments.
Once your QuickBooks Desktop program is updated and your company file is as current as possible, you’re ready to begin your conversion.
Print a balance sheet
Print a balance sheet for the current date. You’ll compare this balance sheet to the balance sheet from QuickBooks Online to ensure all of your data is transferred correctly.
Step 3: Convert your QuickBooks Desktop file to QuickBooks Online
Begin the migration of your QuickBooks Desktop Pro or Premier to Online by clicking on Migrate this company file to QuickBooks Online under the Company menu in your QuickBooks Desktop program. Enterprise users should read the next section for how to trigger the conversion wizard in Enterprise.
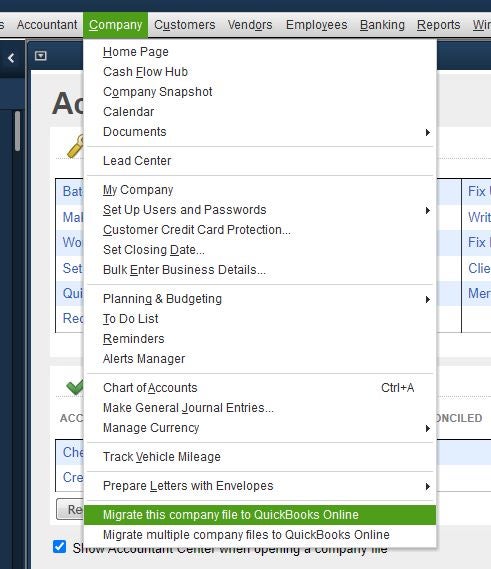
The conversion wizard should now open, and you can click the Get Started button.
QuickBooks Desktop Enterprise users
The conversion process for Enterprise users is the same as for Pro and Premier users, except for how you trigger the conversion wizard. Enterprise users don’t have the option to start the conversion under their Company menu as illustrated for Pro and Premier users.
QuickBooks Desktop Enterprise users must follow these steps to open the conversion wizard:
- From the home dashboard in Enterprise, simultaneously press CTRL+1. This will open a Product Information window.
- Now simultaneously press CTRL+B+Q.
- Close the Product Information window and the conversion wizard will launch.
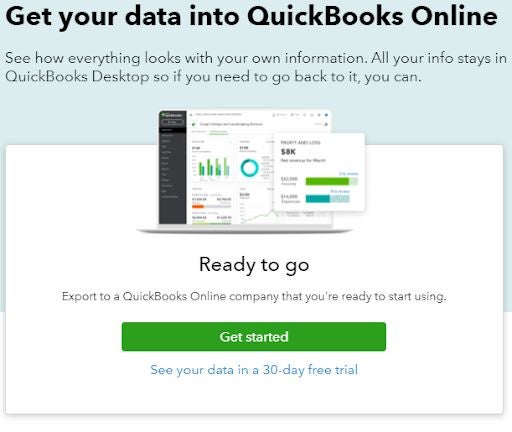
Next, you’ll select to bring over either all the available information from your QuickBooks Desktop file or only the information you select. We suggest converting all of the available data at once.
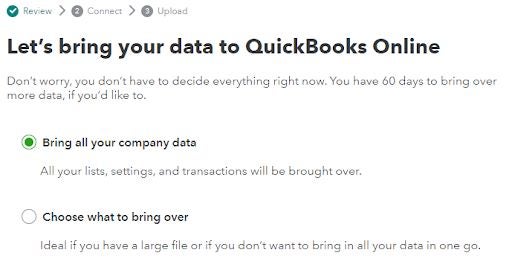
If you select Choose what to bring over from the screen above, you’ll have two options:
- All lists and balances.
- Only lists.
Neither of these options will bring over the transactions from your desktop company, which is good if your company file is very old or very large. On the downside, you’ll need to go to your old QuickBooks Desktop program to look up any old transactions if questions arise.
The final step in the wizard is to select the QuickBooks Online company file to transfer your data. Select carefully as the data transferred from QuickBooks Desktop will replace all of the existing information in the company file.
The wizard will list all of the QuickBooks Online companies associated with the email address listed in the upper right corner of the screenshot automatically. If this doesn’t match the email address you used to set up your new QuickBooks Online company in step 1, then click Sign in to another account and complete the sign-in process. Once you are signed into the proper account, you should see the company created in step 1 listed as one of the options.
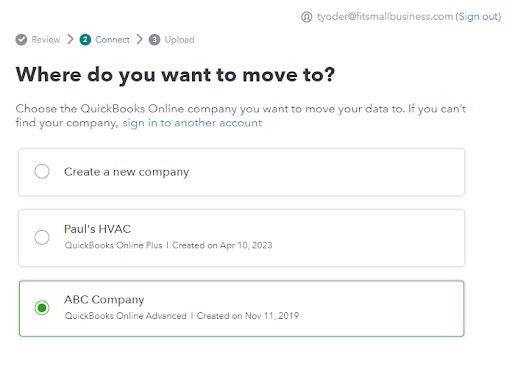
After selecting Continue, you’ll need to confirm your selection and acknowledge that you understand all data in that QuickBooks Online company file will be replaced with the newly transferred data. Once done, you’ll see a confirmation that your data is being transferred to the cloud.
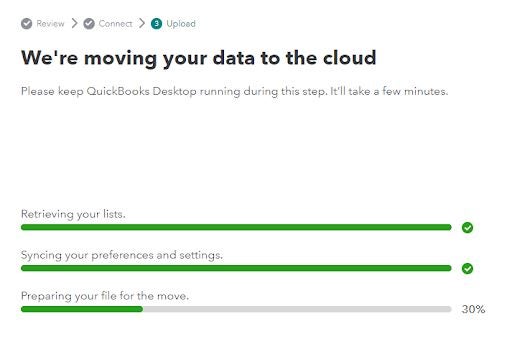
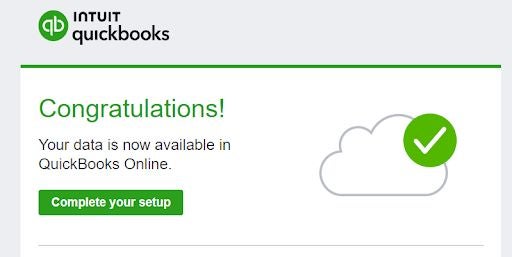
After performing the migration from QuickBooks Desktop to Online, you should receive a congratulatory email from Intuit telling you that your QuickBooks Online company is now available. If your desktop file is very large, it could take several hours before the process is complete and you receive your email.
Step 4: Finish setting up your QuickBooks Online company
After logging into your new QuickBooks Online company, there are a few things we recommend you do to get off to a great start.
Print a balance sheet
Before making any changes in QuickBooks Online, print a balance sheet for the current date and compare it to the balance sheet printed from QuickBooks Desktop in step 2. Hopefully, it will match perfectly — but if not, then you’ll need to investigate any differences and correct them in QuickBooks Online before continuing. You can log back into your QuickBooks Desktop company to help identify what might be causing the differences.
Connect bank and credit card accounts
While your bank and credit card activity should have transferred over in the conversion from QuickBooks Desktop, the connections to your bank did not. You’ll need to reestablish any of these connections you wish for transactions to flow through from your bank account. This isn’t mandatory, but we recommend it to save time and eliminate data entry errors.
To get started connecting your bank accounts, you’ll need to:
- Hover over Transactions in your left menu bar.
- Click Bank transactions.
- Click the drop-down arrow next to Link account.
- Select Manage connections.
Add an accountant user
One of the biggest advantages of QuickBooks Online over Desktop is that your accountant can have real-time access to your books anytime they need it without interrupting your work. All you need to add an accountant user is their email address. They’ll receive an automated email and, after a few clicks, they’ll be able to access your books directly from their QuickBooks Online Accountant program.
To add an accountant user, click on the cog wheel in the upper-right corner of your QuickBooks Online dashboard, then select Manage users in the Your Company column:
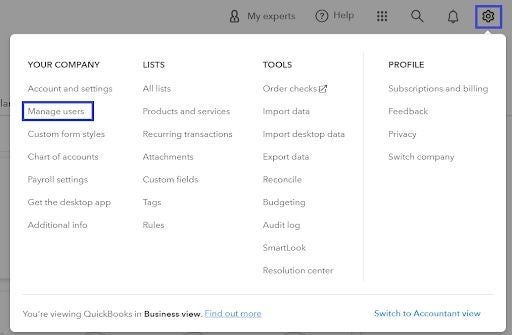
Next, click the Accountants tab in the upper-left of the Manage users screen, and then click the green Invite button.

What to do when there are problems converting from QuickBooks Desktop to Online
Although the conversion wizard works fine for most users, it might sometimes fail either because your desktop file is too large or corrupt or because of unexplained reasons. If this happens, we suggest the following steps to set up your new QuickBooks Online company without having to completely start from scratch:
- Subscribe to a new QuickBooks Online company if not already done.
- Export the following lists from your QuickBooks Desktop company:
- Items
- Chart of Accounts
- Customers
- Vendors
- Import the lists into your QuickBooks Online company.
- Input beginning balances from your QuickBooks desktop balance sheet (and income statement if you’re in the middle of an accounting period).
What we think of QuickBooks Online
QuickBooks Online has been drastically improving with new features and capabilities every year to the point that it is now better than QuickBooks Desktop Pro and Premier for most small businesses. We encourage small businesses to take the leap and convert from Pro and Premier to QuickBooks Online.
QuickBooks Desktop Enterprise still has some unique features, and there aren’t any plans to phase it out, so Enterprise users might stick with the desktop product unless they want the convenience of cloud-based software like QuickBooks Online. You can learn more in our QuickBooks Enterprise review.
Frequently asked questions
Can I convert my QuickBooks Desktop to QuickBooks Online?
Yes. QuickBooks Desktop users with 2021 or later editions of Pro, Premier or Enterprise can convert to QuickBooks Online by selecting Migrate this Company File to QuickBooks Online under the Company menu in their QuickBooks Desktop program.
How long does it take to convert from QuickBooks desktop to online?
The conversion itself only takes a few minutes, but you’ll want to spend some time selecting the best QuickBooks Online version for your business and ensuring your QuickBooks Desktop company file is as up to date as possible.
Should I switch from QuickBooks Desktop to Online?
We recommend QuickBooks Desktop Pro and Premier users switch to QuickBooks Online, as these programs will no longer be offered to new customers starting Aug. 1, 2024. While no announcement has been made by Intuit, we anticipate it will stop supporting Pro and Premier for existing customers in 2027 or earlier. QuickBooks Enterprise users can stay with the desktop program for the foreseeable future.
Can I use QuickBooks Online if I have the desktop version?
No, QuickBooks Desktop and QuickBooks Online are two separate platforms that do not integrate. You can convert from QuickBooks Desktop to QuickBooks Online but, after the conversion, you’ll need to strictly use QuickBooks Online.
